The RIGHT Way to Remove Your Cuticle
Make Your Manicure Last Longer!
One of the secrets to getting your manicure to last longer is to remove the cuticle from your nail plate.
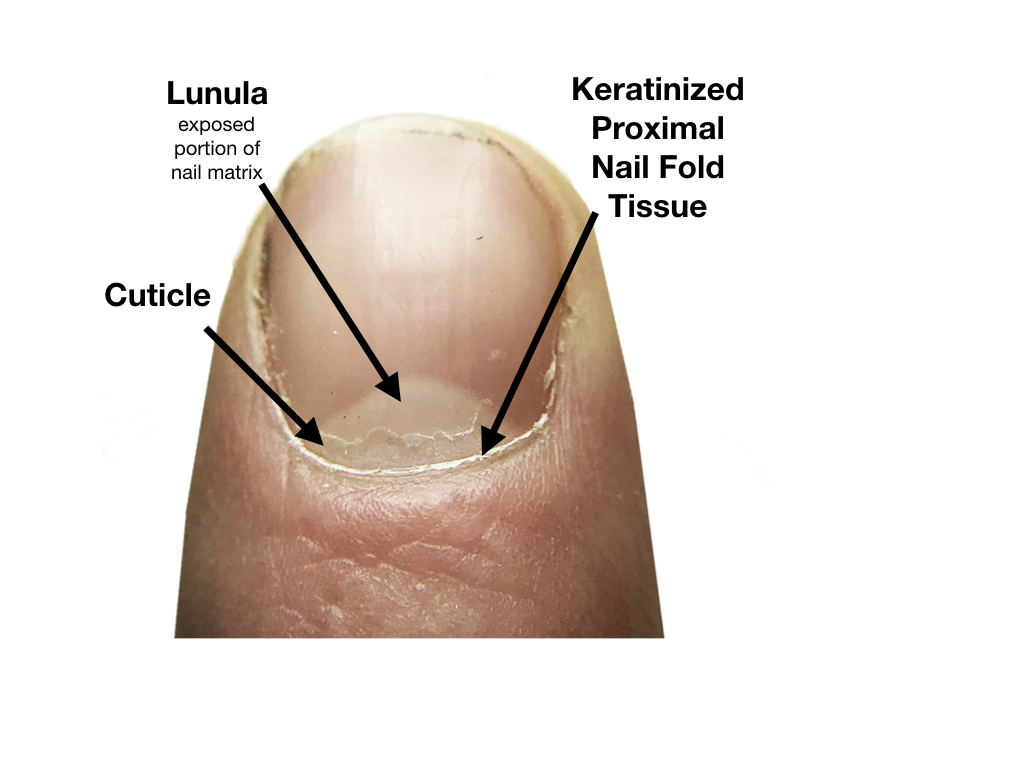
MYTH-BUSTING FACTS: We've been taught the incorrect definition for the “cuticle.”
The tight band of skin at the base of your nail plate is NOT the cuticle. That band of skin is called the “Keratinized Proximal Nail Fold Tissue” or “nail fold."

The cuticle is actually the thin layer of skin that sticks to your nail plate and pulls away from your nail fold.
When you remove the cuticle from your nail plate, your nail polish will be better able to bond to your nail.
Base coat was developed to bond to your nail plate, not to your skin. This means, when you remove the dead cuticle skin from your nail, your nail polish will be able to bond directly to your nail. And that's GOOD!
Remove Your Cuticles the RIGHT Way for Healthy Nails

Watch the video above to learn as Ana shows you the best and safest way to remove the cuticle so your manicures last longer. Remember, polish doesn’t stick to skin!

Removing the cuticle is important but let’s do it the right way! We all want to grow our nails faster and stronger. We want our nails and manicures to stop peeling and chipping. And we also want truthful information we can trust. You can find it here.

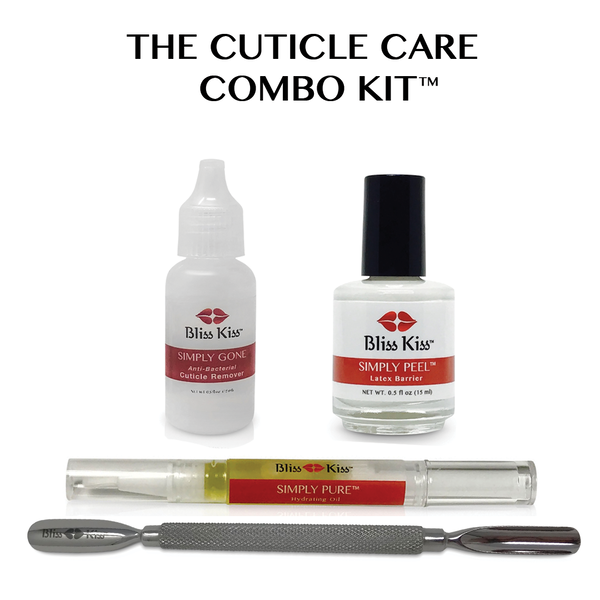
How to Use Simply Gone™
Simply Gone™ is a luxuriously thick, no-drip cuticle remover in a precision brush pen, giving you control without the mess. The fast-acting cream softens and lifts dead cuticle in seconds, creating a smooth, clean nail plate that helps polish grip and last longer.
It’s gentle, non-irritating, and designed to remove only the dead cuticle — the quick prep step that makes every manicure look better and wear longer.
✔️ Thick, no-drip cream formula in a precision brush pen applicator
✔️ Easy-to-use precision brush = less waste, better control
✔️ Works in 30–60 seconds so you can get back to your day
✔️ Gentle and effective—no burning, stinging, or harshness
✔️ Perfect for prepping nails before a manicure
From Start to Finish

How to Use Simply Gone™
Apply to one hand at a time.
-
Twist the pen to release the cream.
-
Apply a thin layer directly to the nail plate at the base of each nail (NOT the skin).
-
By the time you've finished the last nail, go back to the first and gently push back the cuticle using a cuticle pusher or orange wood stick.
-
Wipe nail plate clean immediately with a tissue, cotton round, and rinse hands thoroughly with water.
-
IMPORTANT! Do not leave on longer than 60 seconds.
-
Follow with Simply Pure™ nail oil to rehydrate and protect your nail plate and skin.
Make Your Manicure Last Longer!
One of the secrets to getting your manicure to last longer is to remove the cuticle from your nail plate.
MYTH-BUSTING FACTS: We've been taught the incorrect definition for the “cuticle.”
The tight band of skin at the base of your nail plate is NOT the cuticle. That band of skin is called the “Keratinized Proximal Nail Fold Tissue” or “nail fold."
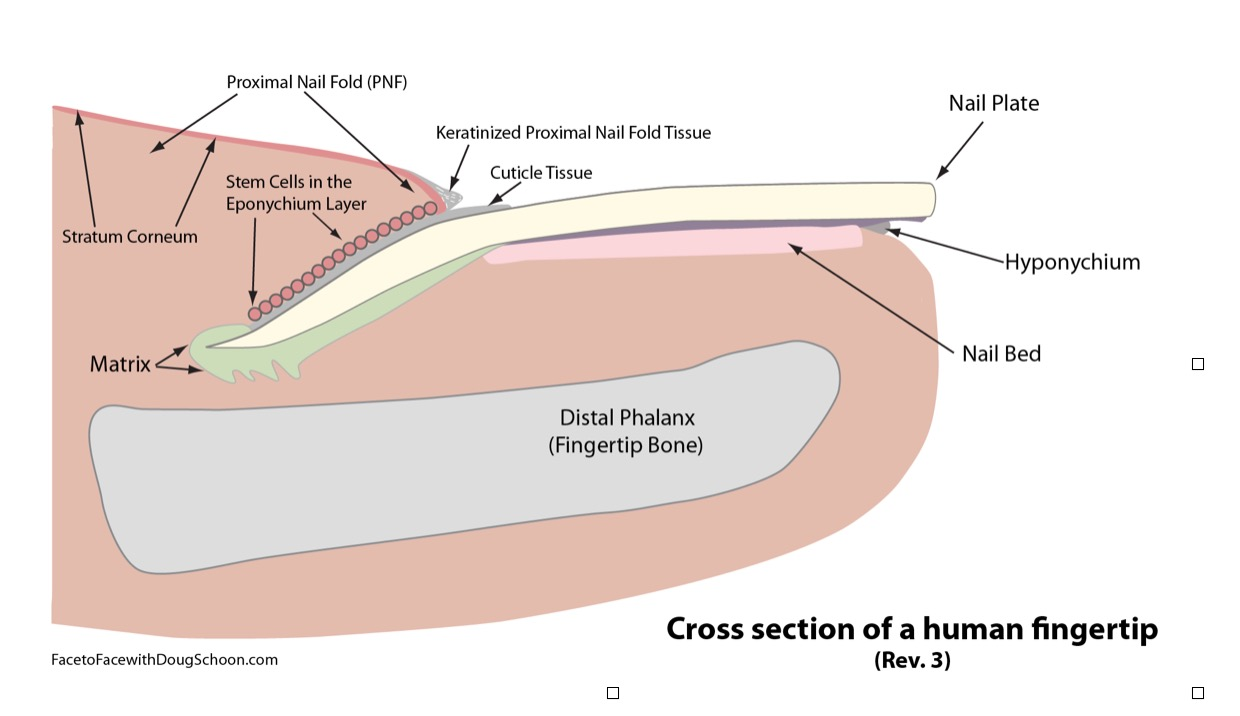
The cuticle is actually the thin layer of skin that sticks to your nail plate and pulls away from your nail fold.
When you remove the cuticle from your nail plate, your nail polish will be better able to bond to your nail.
Base coat was developed to bond to your nail plate, not to your skin. This means, when you remove the dead cuticle skin from your nail, your nail polish will be able to bond directly to your nail. And that's GOOD!
Remove Your Cuticles the RIGHT Way for Healthy Nails
When removing dead skin, it’s very important to protect your live skin with a liquid latex barrier like Simply Peel™. Honestly, it’s so much fun to Simply Peel like no big deal! The best way to do cuticle cleaning in your nail care routine is to very carefully slide the dead skin off with a cuticle pusher.
Watch the video above to learn as Ana shows you the best and safest way to remove the cuticle so your manicures last longer. Remember, polish doesn’t stick to skin! Removing the cuticle is important but let’s do it the right way! We all want to grow our nails faster and stronger. We want our nails and manicures to stop peeling and chipping. And we also want truthful information we can trust. You can find it here.
How to Use Simply Gone™
Ana searched for years for a solution to the strong, dissolving power of cuticle removers without damaging the skin around fingernails. And she finally found it.
Simply cover your skin with Simply Peel™ Liquid Latex Barrier. Let it dry and then you are free to apply cuticle remover safely.
From Start to Finish
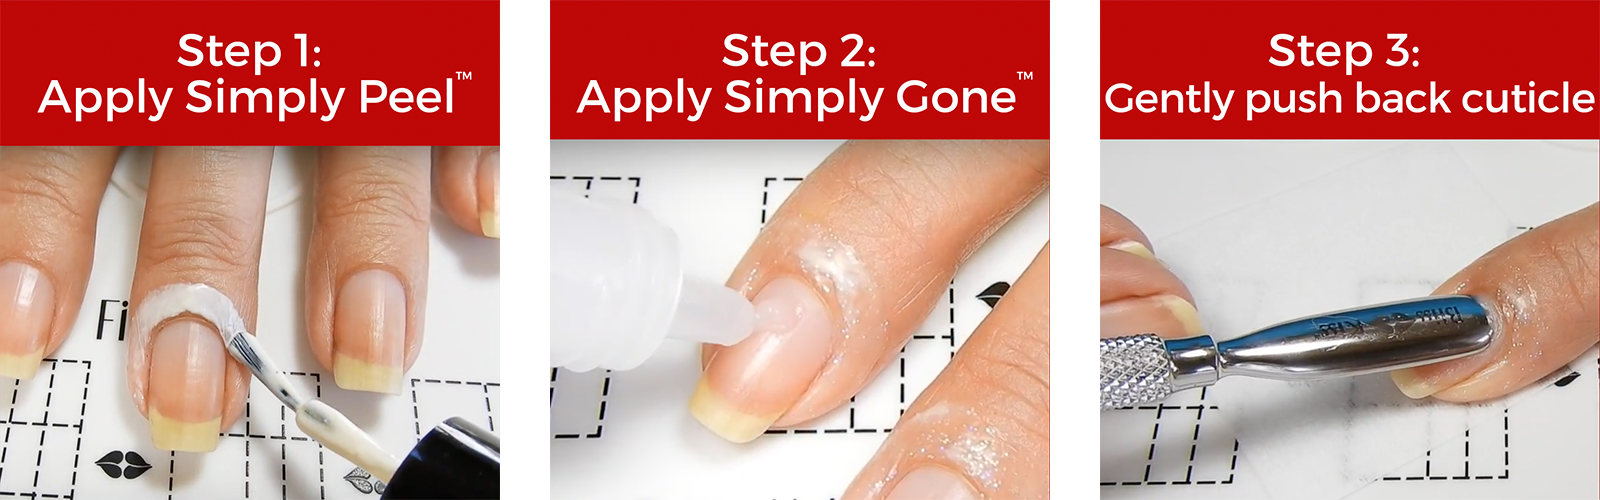
- Apply Simply Peel™ to the skin around your nails on one hand and allow to dry.
- Squeeze a tiny amount of Simply Gone™ onto your nail plate (about the size of the head of a quilting pin - remember, a little goes a LONG way) and use the tip of the bottle to carefully spread it over your nail. Repeat on all 5 fingers of the hand you started with. Simply Gone™ works fast. After you've applied Simply Gone™ to each of your nails, start back at the first finger you applied it to and begin to remove Simply Gone™. IMPORTANT: Do Not Leave On Longer Than 1-2 Minutes.
- Using a cuticle removal tool–gently, gently, gently–scrape back and stop right at the proximal fold. Glide the tool against the surface of your nail plate. The Simply Gone™ will have dissolved the cuticle so downward pressure is unnecessary (and too much pressure can bruise your nail plate or cause other damage).
- The removed cuticle and cream will build up on the back of the removal tool. Wipe that onto a paper towel. Repeat Steps 1-4 on your other hand.
- Once you are finished removing your cuticles from your nails, remove the latex barrier and rinse your hands with water.