US Dollars
 CAD
CAD
 Euro
Euro


SIMPLE TUTORIAL
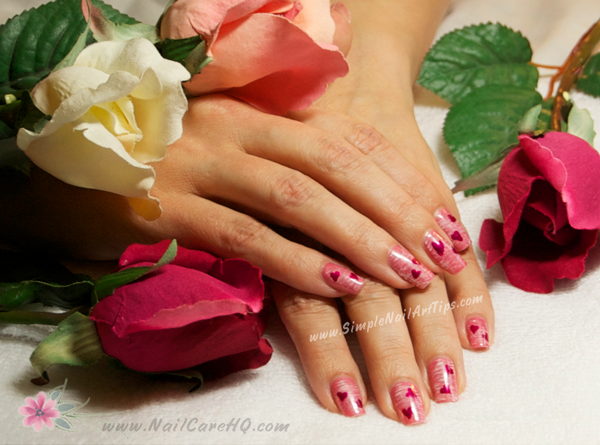
Sweet Pink Heart Nails for Valentine’s Nail Art Tutorial
Here's a classic older post from an international nail art tutorial contest we hosted several years ago. This time I made the tutorial instructions a lot simpler for different nail artists to enter. Only written instructions were required instead of step-by-step photo tutorials.
Part of the prize for the winner was that I would wear her design for Valentine’s Day. This is the perfect sweet, yet grown up design on nails for Valentine’s Day. I’ve included Sunandha’s directions in this post and you can see her winning entry at www.simplenailarttips.com/valentines-nail-art-hearts-on-fanned-pink-nail-art-tutorial
To be honest, this is a design I would have never been drawn toward to create on my nails. But I’m so happy I did! It’s a very simple design and has gotten a lot of compliments. I hope you’ll give it a try with your own colors.
Have Fun! ~Ana
Instructions

- Apply your base coat – to protect your nails and create a surface that nail polish bonds to.
- Paint your nails in the chosen base polish. I chose “Berry Parfait” by Jordana. It is a gorgeous Pink color.
- Once it’s dry, take little white polish in the foil paper. Use fan brush and apply the white polish on your nail horizontally from one side of the nail and then the other side. (if the polish doesn’t apply in streaks, but as a broad stroke, just run the fan brush over it twice without dipping it in polish, you will get the streaks)
- After the white polish is fully dry, apply pink polish in the same method described in step 3 (same as your base polish) to your nails. Don’t cover your white polish fully instead just enough for the white to peek through. (Think of a white nail polish sandwiched between pink polishes)
- Let them dry again fully.
- Now for your heart: There are two methods. one is to apply two dots using ur dotting tool and just drag the dots down to make a heart. Second is to use your dotting tool to make a “V” shape first and then manipulate it to make a heart. ( You can also use free hand) I love the second method since it easy to handle it even if I make a mistake when painting a heart.
- Draw hearts on ur nails as described in step 6. I used a shimmery pink polish. Just as many hearts as you want. Its your wish.
- After its all dry, top it off with a top coat to seal in your design.
- Now sit back and enjoy your nails.
TIP: The white striping can be done with white polish or acrylic paint and a fan brush.
Thanks For Your Support
If you find this tutorial useful, please click on my Amazon affiliate links below if you would like to order any of the materials for this manicure. I will receive a small commission -at no cost to you- as a small thanks for your support.
Sunandha’s Materials
(P.S. Sometimes I will choose a similar product if the original isn’t available on Amazon)
Base: Jordana, “Berry Parfait”
White Polish: NYC Long wearing Nail enamel “French Tip”
Hearts: Zoya Nail Polish “Izzy”
Top Coat: NYC Long wearing Nail enamel Extra shiny Topcoat.
Ana’s Materials
Base: Maybelline Express Finish, Mod Mauve #70
White Polish: Wet n Wild, French White Creme #449